- An Arduous Endeavor (Part 1): Background and Yak Shaving
- An Arduous Endeavor (Part 2): Display Emulation
- An Arduous Endeavor (Part 3): CPU Emulation
- An Arduous Endeavor (Part 4): Input Handling
- An Arduous Endeavor (Part 5): Buzzes and Beeps
- An Arduous Endeavor (Part 6): Save States and Rewind
- An Arduous Endeavor (Part 7): Automated Builds
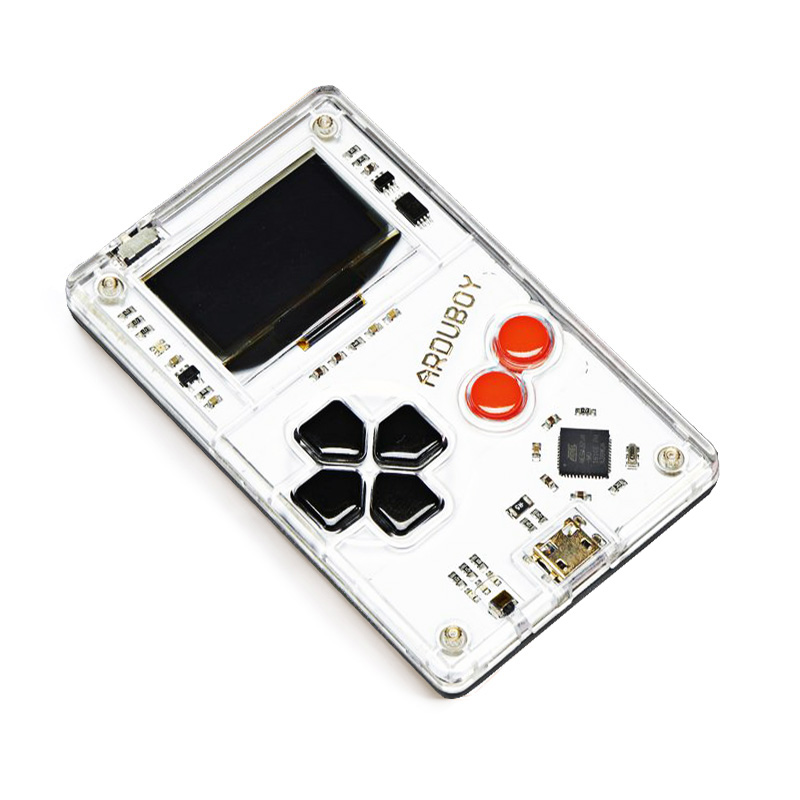
I recently picked up a low-powered handheld gaming device which has gotten me excited about playing retro games again. Part of the fun of such devices (for me, anyway) is tweaking them and getting them set up just right, and doing that has involved exploring the various discords related to handheld gaming. Which led me to discovering a new-ish handheld system that I hadn’t heard of before: the Arduboy.
The Arduboy is “a miniature game system the size of a credit card,” and it’s made out of off-the-shelf components – specifically, an Arduino Micro/Leonardo (ATMega32u4) plus an OLED display driven by an SSD1306. This is an 8-bit system made for the 2010s.
There’s a very full-featured web-based IDE and emulator called ProjectABE, but I couldn’t find any emulators for playing this on my handheld device of choice. So, I decided that I’d brush off my dusty C/C++ skills and try to write one.
Libretro
The state of the art in emulator development is to write a “core” using the Libretro API. Libretro defines a standard way of getting inputs, displaying video, playing audio, etc., so your emulator code focuses solely on the emulation aspect. A nice bonus is that, as long as your code can compile on another platform, you can run the emulator on any of the supported architectures/operating systems that Libretro supports.
Unfortunately for me and my rusty low-level programming skills, I couldn’t find many posts/guides that cover how to get started developing a core for libretro. The most helpful resources I found were a two-part blog series on writing a Vectrex emulator (which appears to have been intended to be much longer) and a blog post about writing a Gameboy Libretro core for an existing Gameboy emulator.
Yak Shaving
I tend to spend a lot of time yak shaving on any new project, especially if I’m entering unfamiliar territory. This project features a lot of new (or 10+ years outdated) concepts/tools for me:
- C/C++
- CMake
- Libretro
- Arduino emulation
- Sound generation
Some of these things are relatively straightforward for me to wrap my head around, but others, not so much. Last time I built things in C++ I was using Visual Studio, and before that it was handcrafted Makefiles for Linux-based systems. I want to ensure I have an automatable, repeatable, cross platform build so that the core can be built for multiple targets.
Libretro publishes a sample core called skeletor that is very simple, but perhaps a little too simple – it is plain C, and I am pretty sure I want to use C++ for this project.
Vectrexia, the Vectrex core mentioned above, uses C++ and CMake to build the project. I decided this would likely be the route I’d go.
In my day-to-day job, I find formatters and static analysis tools invaluable for helping me use the most idiomatic paradigms for the language(s) I develop in. I came across a GitHub repository called clang-blueprint that showed how to use CMake in combination with several tools for static analysis:
- clang-format for automatic consistent code formatting
- clang-tidy for static analysis/highlighting of potential problems
After copying that repo and doing some simple customization, I had something that didn’t do anything, but it could compile with a simple cmake && make, and that’s half the battle!
Oh, and one more important yak shaving detail: a project name! I originally considered AABE (Another Arduboy Emulator), but there are enough of those kinds of project names. After spending so much time yak shaving, though, it seemed fair to me to name the project Arduous, as building this will certainly require a great deal of effort.
IDE
I also have gotten incredibly used to having an IDE that offers me some sort of autocomplete (ideally, intelligently), and highlights syntax errors/problematic code. I am a big fan of Jetbrais’s IntelliJ-based offerings, but I don’t have a license for CLion, their C/C++ editor (which seems really nice!). So I looked into what’s possible with Visual Studio Code, and it turns out, quite a lot!
I installed the following extensions:
ms-vscode.cpptoolsxaver.clang-formatnotskm.clang-tidyms-vscode.cmake-toolstwxs.cmake
I also set up my workspace with some custom settings:
{
  "editor.formatOnSave": true,
  "editor.defaultFormatter": "xaver.clang-format",
  "clang-tidy.lintOnSave": true,
  "clang-tidy.fixOnSave": false,
  "clang-tidy.compilerArgs": [
    "-std=gnu++11",
    "-Iinclude",
    "-isysroot /Library/Developer/CommandLineTools/SDKs/MacOSX11.3.sdk"
  ]
}
Libretro API
Tools configured, I set about implementing the bare minimum Libretro API to get a core working within Retroarch. The Vectrex build-along blog post was very helpful in understanding how to do this.
I basically had to implement a few functions that actually return something, and stub out a bunch of other functions so the whole thing would compile. The full source is available in libretro.cpp.
Some interesting bits are highlighted below:
void retro_get_system_info(struct retro_system_info* info) {
    memset(info, 0, sizeof(retro_system_info));
    info->library_name = "arduous";
    info->library_version = "0.1.0";
    info->need_fullpath = false;
    info->valid_extensions = "hex";
}
retro_get_system_info sets basic information about the core itself.
void retro_get_system_av_info(struct retro_system_av_info* info) {
    int pixel_format = RETRO_PIXEL_FORMAT_RGB565;
    memset(info, 0, sizeof(retro_system_av_info));
    info->timing.fps = TIMING_FPS;
    info->timing.sample_rate = TIMING_SAMPLE_RATE;
    info->geometry.base_width = FRAME_WIDTH;
    info->geometry.base_height = FRAME_HEIGHT;
    info->geometry.max_width = FRAME_WIDTH;
    info->geometry.max_height = FRAME_HEIGHT;
    info->geometry.aspect_ratio = FRAME_ASPECT;
    environ_cb(RETRO_ENVIRONMENT_SET_PIXEL_FORMAT, &pixel_format);
}
retro_get_system_av_info sets information about the audio and video settings of the system.
void retro_run(void) {
    uint16_t fb[FRAME_WIDTH * FRAME_HEIGHT];
    memset(fb, BLACK, sizeof(uint16_t) * FRAME_WIDTH * FRAME_HEIGHT);
    fb[0] = rgb565(255, 0, 0);
    fb[FRAME_WIDTH + 1] = rgb565(0, 255, 0);
    video_cb((void*)fb, FRAME_WIDTH, FRAME_HEIGHT, FRAME_WIDTH * sizeof(uint16_t));
}
retro_run is called every frame. At this point, I hadn’t written anything, but I wanted to verify that it was in fact able to display something on the screen, so I hardcoded two pixels at the top left corner of the screen to verify they were being shown.
Building and Running
From the repository root:
mkdir build
cd build
cmake ..
make
/Applications/RetroArch.app/Contents/MacOS/RetroArch -L arduous_libretro.dylib ../roms/minimal.hex
Subsequent builds just require:
make && /Applications/RetroArch.app/Contents/MacOS/RetroArch -L arduous_libretro.dylib ../roms/minimal.hex

And… it’s alive!
Follow along with development at https://github.com/jmaroeder/arduous.
Leave a Reply to BucketCancel reply